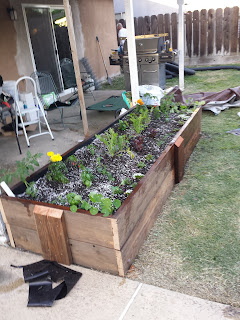
The traditional methods I was raised with are very water intensive. Often, I would be watering twice a day, to keep ahead of evaporation. The rest of the water would percolate down through the soil, and below the level needed for my plants. I knew that in my drought plagued area, I had to find a better way.
My investigations led me to AlboPepper, OneYardRevolution, and later to RobBob on YouTube. I also learned about the Square Foot Gardening method and how it can make gardening easier, more productive, and more fun. With these intrepid urban gardeners as my teachers, I began studying sub-irrigated planters (aka wicking beds), soil composition, and permaculture.
In mid-April, the hubster and I built our very first sub-irrigated planter. We used a plan very similar to AlboPepper's.
It's a 9'x3' raised bed made from scrap lumber. It's about 16" tall. We filled the bottom of the box with sand to make sure the base under the liner was level.
Then, we lined to box with pond liner (got a deal on it on Amazon). And laid corrugated, perforated drain pipe in the bottom (capped the ends of the pipe with weed cloth and duct tape to keep the soil out).
And filled the box with soil using the mix recommended by Mel Bartholomew.
And planted! Nasturtiums, Alyssum, Salvia, Marigold, Basil, Catnip, Arugula, Red Lettuce, Red veined sorrel, Mystery mixed greens, Chives, Tomatoes, Pasilla chilies, Ghost chilies, and Peas.
We made several rookie mistakes while building that planter.
1. The liner in the box has no slack in the bottom. We folded it all nice and neat, and stapled it in place, laid the pipe, filled it with soil, and then filled the resevoir with water. All that weight (about a 1 ton) made the liner stretch a bit. It didn't cause any tearing, but on later planters we left more slack in the bottom, and left the stapling until the box was full.
2. We didn't check for water leaks before filling it with soil. You'd think it would be a no-brainer, but we were so excited to get to planting, it didn't occur to us to check. And yes, we had a leak around the overflow pipe, so we had to dig out the soil and patch it.
3. I didn't top water the soil before planting it. Over the next week after planting, the soil settled. What was once a nearly full planter, is now more than 4 inches below the top of the box. This places the top of the soil a mere 8 inches above the reservoir. I think that is going to be too short of a distance for some of the bigger plants that I put in. My plan is to gently back fill with mulch.
4. Waiting until April to plant. Spring is a slow blink here in the 9b, and now we're on to summer. Some of the plants (lettuces) that hate heat are not going to make it to July I think. I was hoping to let them go to seed and replant for next year. I missed blueberry and blackberry harvests because I waited to start this project, too.
Good advice:
1. Use as much donated and scrap material as you can. If you don't, the project could get really expensive really quickly.
2. Cover the ends of the corrugated-perforated pipe with weed cloth. I left the ends open on another smaller SIP container, and the pipes filled with soil. which eventually would have filled with roots and made and an unholy mess.
3. Don't use clear plastic totes for SIP containers. I built a couple of them thinking it would be cool to see what was going on in the soil, but the clear plastic let the water reservoir in the bottom be exposed to sunlight. And as we learned in school, sunlight on nutrient rich water allows algae to flourish. So, we wrapped those bins in the scraps of pond liner we had laying around, and the algae died.
4. Mulch, don't cover with plastic. If you dash about the internet, a lot of the early wicking bed wizards recommend covering the bed to decrease water loss even more. I live in zone 9b, and during the last week of May it was over 100F for a week, and it's predicted to be that hot for the next week. At the end of a day, the soil is warm, and it retains that warth for hours. Adding a layer of plastic to the top will only make that worse. Mulch will breakdown over time and provide nutrients to your plants (and worms!). Just don't use a cedar or rubber mulch. The cedar (or pine needles) will inhibit seed sprouting. And rubber stinks when it's hot.
5. We have nasty, disease infested mosquitos here in the Central Valley. Cap of the fill pipes to keep the little buggers out.
6. Start small. Super exciting to finally have a working wicking bed. You'll want to run out and make 50 more. Don't. Make your starter box and figure out what works and what doesn't for your area.


No comments:
Post a Comment
Comment moderation is on. 99% of posts will get reposted as is. The trolls will get deleted without comment. This is my cat and catnip show. Playground rules apply: share, everyone gets a turn, no making fun of others, no ganging up on someone.